Normalize audio:
why is it still uneven?
Peak normalization applies one gain to the whole selected file; it does not independently lift its quiet passages. A brief peak can limit that gain, so reaching the chosen peak target does not prove the passages are balanced. Identify whether your goal is a peak ceiling, integrated loudness or more even speech before choosing a process. Audio normalisation can raise or lower the level.
This site converts audio to MIDI. It does not provide an online audio-normalization upload service. The files below demonstrate a controlled calculation, not a commercial normalizer test.
Change one sample. Keep the peak target.
On October 16, 2026, we made a six-second, 48 kHz, mono, signed 16-bit WAV with a 1 kHz tone: amplitude 3,000 sample counts for three seconds, then 9,000 for three seconds. A second input differs in exactly one of its 288,000 frames: at 0.25 seconds, zero becomes 30,000 counts. Both have the same quiet and loud analysis regions. The isolated changed sample is outside those regions, but inside the full-file peak scan.
Our standalone Node script chooses a −1 sample dBFS target and scales every stored sample by one constant, rounds to integer PCM, writes the WAV, then reads it back. We independently repeated the four-file calculation on October 17; all complete-file hashes and measurement rows matched. No normalization application or listening test ran.
| Case / stage | Applied gain dB | Sample peak dBFS | Quiet RMS | Loud RMS | Loud−quiet dB |
|---|---|---|---|---|---|
| no-spike / input | 0.000 | -11.22415 | 2121.276 | 6363.891 | 9.54251 |
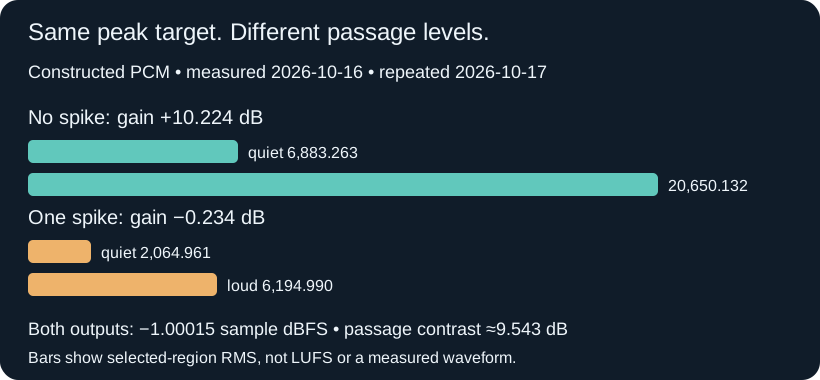
| no-spike / normalized | 10.224 | -1.00015 | 6883.263 | 20650.132 | 9.54257 |
| one-spike / input | 0.000 | -0.76657 | 2121.276 | 6363.891 | 9.54251 |
| one-spike / normalized | -0.234 | -1.00015 | 2064.961 | 6194.990 | 9.54257 |
Download the export-check worksheet (CSV). It separates four measured rows, a recommendation and a blank observation. The complete precision, selections and hashes are in the measurement record.
What the equal peaks do—and do not—tell you
The no-spike source receives +10.223997 dB. Adding only the one sample changes the full-file gain to −0.233578 dB: that version is attenuated slightly. Both output peaks are 29,204 counts, or −1.0001519 sample dBFS. Yet the second output's selected passages have much smaller RMS values. Their input passages were identical.
The selected loud-to-quiet difference stays near 9.54257 dB in each output. A shared multiplier preserves the underlying amplitude ratio; integer rounding causes a small difference in the stored results. Target success and passage balance are therefore separate acceptance checks. Raising the same global target again raises both passages; it does not selectively fix their relationship.
This demonstrates a specific sample-peak implementation. It does not say every feature named “normalize” behaves identically: a product may include limiting, compression or other processing. Nor does it say a visible peak should always be removed. Inspect its source and purpose before changing it.
A record you can use on your own export
- Name the job and the unit. Record whether you need a stored-sample ceiling in dBFS, a loudness target in LUFS, or smaller level differences within a clip. “Make it louder” leaves these choices unresolved.
- Keep the original and define the selection. Note whether the operation covers the whole file, a clip, each channel or each individual track. A different selection can choose a different controlling peak.
- Inspect the largest peak before processing. Mark its time and check whether it is wanted audio or an unwanted transient. In our fixture, one frame controls the global gain even though it is outside both passage measurements.
- Export a copy and reopen that file. Record the actual output format, channel count, peak and any applied gain. A successful progress bar or the target typed into a dialog is not the exported measurement.
- Compare the same two passages. Retain their time selections and measurement units. If your job was evening out speech and their difference remains unacceptable, a global peak operation has not accomplished that job; consider appropriate clip-level editing or dynamics processing and check again.
- Keep unknowns blank. Do not fill LUFS, true peak, audible quality or note accuracy with numbers from a different kind of test. A peak result cannot establish those outcomes.
Choose the process before the button
For Audacity normalize volume, its official Normalize manual describes peak adjustment, optional DC correction and optional independent stereo-channel handling. Select the intended audio, open Effect → Volume and Compression → Normalize, choose the peak target and relevant options, then check a separately exported copy. Our script does not reproduce the DC or channel options.
Audacity Loudness Normalization is a separate effect with LUFS or RMS choices, documented in the official loudness manual. Do not substitute its LUFS value for the sample-peak column above. These are documented software steps, not an Audacity run performed for this page.
For Premiere Pro normalize audio or an MP3 gain workflow, apply the same selection-and-export questions: which metric does this command target, what range does it analyze, and does it adjust each clip or the whole programme? Keep the installed tool's current documentation beside your export record. We did not run Premiere, MP3Gain or a browser audio file normalizer, and the MIDI button here performs none of those jobs.
For an online audio normalizer, check its actual processing and export conditions before providing a recording. A feature name or “local” label alone is not a privacy or sound-quality test. Our fixtures can be downloaded without uploading your own audio.
Keep playback targets separate from this experiment
Spotify's official normalization page describes −14 LUFS in Normal playback mode, with other listener modes and headroom conditions. That is a playback-loudness context, not this experiment's −1 sample dBFS condition and not a universal upload target. Personal −16 or −18 LUFS choices are not universal platform requirements. When a delivery specification applies, record its exact platform, mode, units and current source.
Need to interpret a meter first? See LUFS and channel-context checks. Suspect earlier overload? Use peak level versus clipping history. Need to remove unwanted sound? See noise treatment versus turning everything down. Those are different questions.
Exact files, arithmetic and reproduction
- no-spike-input.wav — 576,044 bytes
- no-spike-peak-normalized.wav — 576,044 bytes
- one-spike-input.wav — 576,044 bytes
- one-spike-peak-normalized.wav — 576,044 bytes
Full measurements and SHA-256 hashes · Standalone Node reproduction script · Worksheet
Each file has 288,000 mono frames at 48,000 Hz, signed16 PCM, six seconds. Target counts = floor(32768 × 10^(−1/20)) = 29,204. Gain = target counts / maximum absolute input sample; gain dB = 20 log10(gain). Stored sample dBFS = 20 log10(absolute peak / 32768). Regional RMS = sqrt(sum(sample²) / selected sample count). Loud−quiet = 20 log10(loud RMS / quiet RMS). Quiet selection: 0.5–2.5 s; loud: 3.5–5.5 s.
node reproduce.mjs --out ./repeat
node reproduce.mjs --out ./repeat --check
Run in a fresh folder with Node; the script preserves an existing observation record. Its original metadata says preparation because the measurements began before publication. The independent October17 repeat is our publication check, not a changed measurement date.
Limits: constructed tones and one sample, not speech, recorded music, a commercial normalizer comparison or a listening test. No microphone, browser upload/export, MP3 encoding, LUFS normalization, true-peak interpolation, compressor, limiter or MIDI-accuracy measurement was performed. Zero stored rail contacts do not prove absence of inter-sample peaks. This example does not establish which target is best for your file.
If your next task is transcription, return to the audio-to-MIDI preparation and review guide; normalization is not evidence that the notes will be correct.